
In this article, we will show you how to dispatch emails to form respondents after they respond to your Google Form.
At the end of the tutorial, we will show you how to adapt this for sending different email content based on a form response.
Follow the steps below to set up Google Forms automatic email responses.
To integrate Google Forms with Google Sheets, follow these instructions:
Copy the URL of the spreadsheet you just created.
Since you cannot send emails directly from Google Sheets, we will use a free software called Lido to do this part. You can create a free account at: www.lido.app/go/signup.
Then follow these steps:

Click Add Data. This will create a Lido table of your Google Form responses.

Go to a fresh worksheet. We will write our email templates in this new sheet. You can use table columns as email variables like so: [@Column].

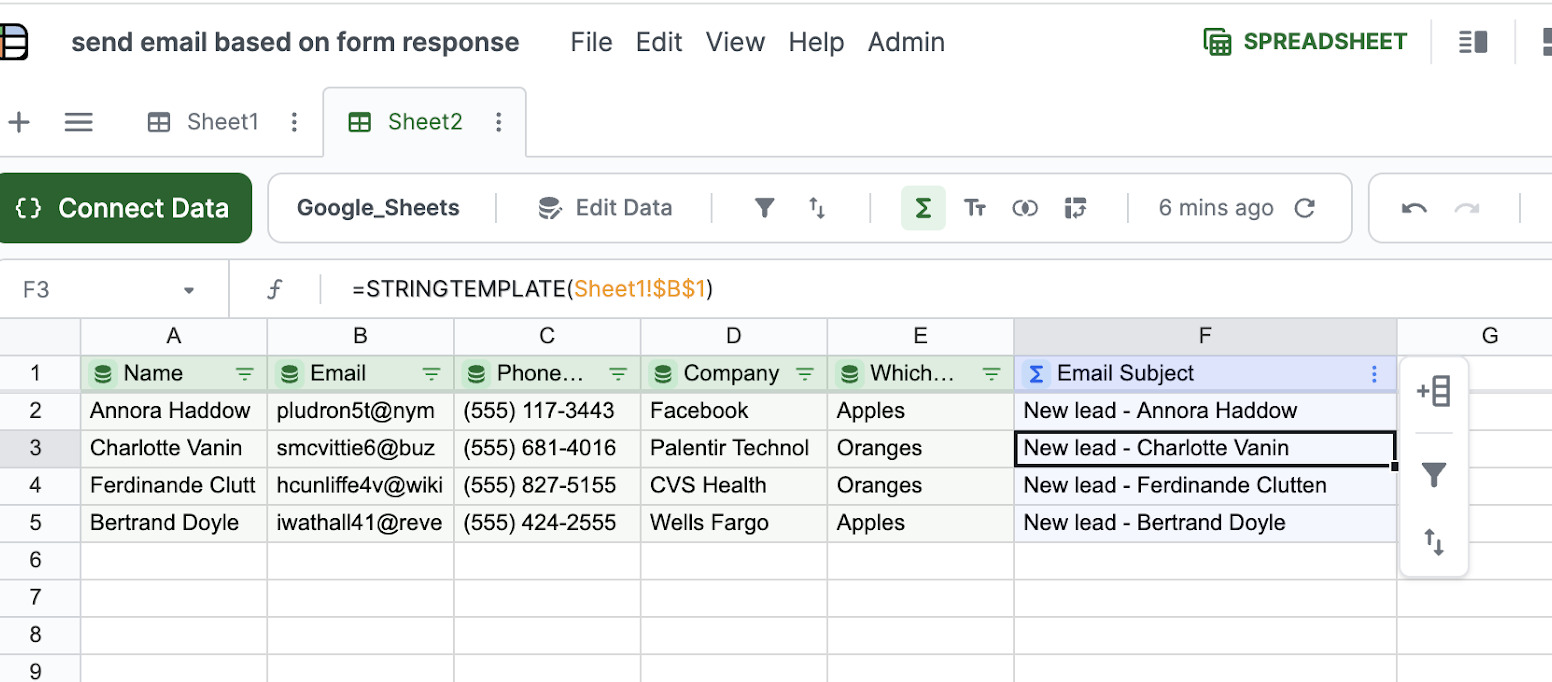
Navigate back to your table. Then, create a computed column. This is a column type in Lido that applies the same spreadsheet formula to every row in a table. Type a column name in the first row of a cell next to your table (cell F1 in this example) to create a new column, and set its type to Computed Column.

Inside of this computed column, we will use the STRINGTEMPLATE formula to replace the variable placeholders from the prior step with the actual content of each row. The formula looks like this:
=STRINGTEMPLATE(“template_cell_location”)
For instance, our template cell for the email subject is in Templates!$B$1, so the formula for cell F2 in the computed column would be:
```=STRINGTEMPLATE(Templates!$B$1)```
When submitted, our table now looks like this. Notice the dynamic replacement of the [@Name] variable in every row.
Repeat these actions to make another dynamic computed column for the email body. Begin by creating a new computed column and inputting:
```=STRINGTEMPLATE(Templates!$B$2)```
Ensure to adjust “template_cell" in this formula to reflect your specific template cell location, and remember to use $ to fix the cell reference, ensuring consistency across all rows.
You should now have a table that looks like this:

We're now ready to use the SENDGMAIL formula. This is an Action formula in Lido, which means that it only runs (e.g. sends an email) when it is explicitly triggered, either manually or via an automation.
The SENDGMAIL formula is structured as follows:
=SENDGMAIL(<sender-credential>, “recipient@example.com”, “subject”, “body”, “status”)
To set this up, add another computed column labeled “Send Email” in column G. Then, enter this formula in cell G2:
```=SENDGMAIL(<sender-credential>, C2, E2, F2, H2)```
Where:
Here, <sender-credential> represents the sending email address. You will need to connect to a Gmail account the first time you use this formula in Lido.
C2 is the recipient email. This may need to change based on how your data is structured.
E2 is the Email subject
F2 is the Email body
H2 is an empty cell in the next column where we will place the status of whether an email has been sent

To test this action, right click on a SENDGMAIL formula and select “Run action.”

You will be prompted to login to the sender email the first time. After the email is sent, you'll notice a "success" message briefly appear in the cell. The cell you designated as the status cell (J2 in this example) will also be updated to display "success."

Our next goal is to adjust our logic to ensure each form response triggers only one email. First, establish a new Linked Column named "Status," which will store text such as “success” and link back to the original data record.

You will be prompted to choose an ID column. This is what Lido uses to keep track of records, so it is important to pick a column that has unique values, like timestamp or respondee email.
Modify the Send Email column formula to include an IF statement checking if an email has been sent:
```=IF(H2<>"success", SENDGMAIL(<sender-credential>, C2, E2, F2, H2))```
Ensure the IF statement’s status cell (H2 in this example) is consistent with the one used in your SENDGMAIL formula.
After this modification, the SENDGMAIL formula will no longer display in the column once an email has been dispatched.
Finally, we will automate the Send Email column to have emails sent automatically as new responses are added.
Click the three-dot menu on your Send Email column and select "Run column on a schedule."

This will open the automation panel. In this screen, you will need to select an interval for how frequently you want Lido to check for updates.
Every time an automation runs, Lido first fetches the newest data from your Google Sheet, which is connected to your Google Form, then triggers all of the SENDGMAIL actions in the column.
We will choose a 15 minute automation interval in this example. Then hit “Save”.

Your automation is now running! When you receive a new form response, Lido will automatically send an email based on the content of that response.
It is easy to also send different email content based on the form response.
Let’s say we still want to send emails based on whether somebody has selected Apples or Oranges, but we want the messages to differ based on the response. In this case, we can set up a matrix of our different email responses in Step 3: Make response email templates.

And then, in Step 4: Construct dynamic email content, we will need to add an XLOOKUP to the STRINGTEMPLATE formula that we use to construct the dynamic emails.
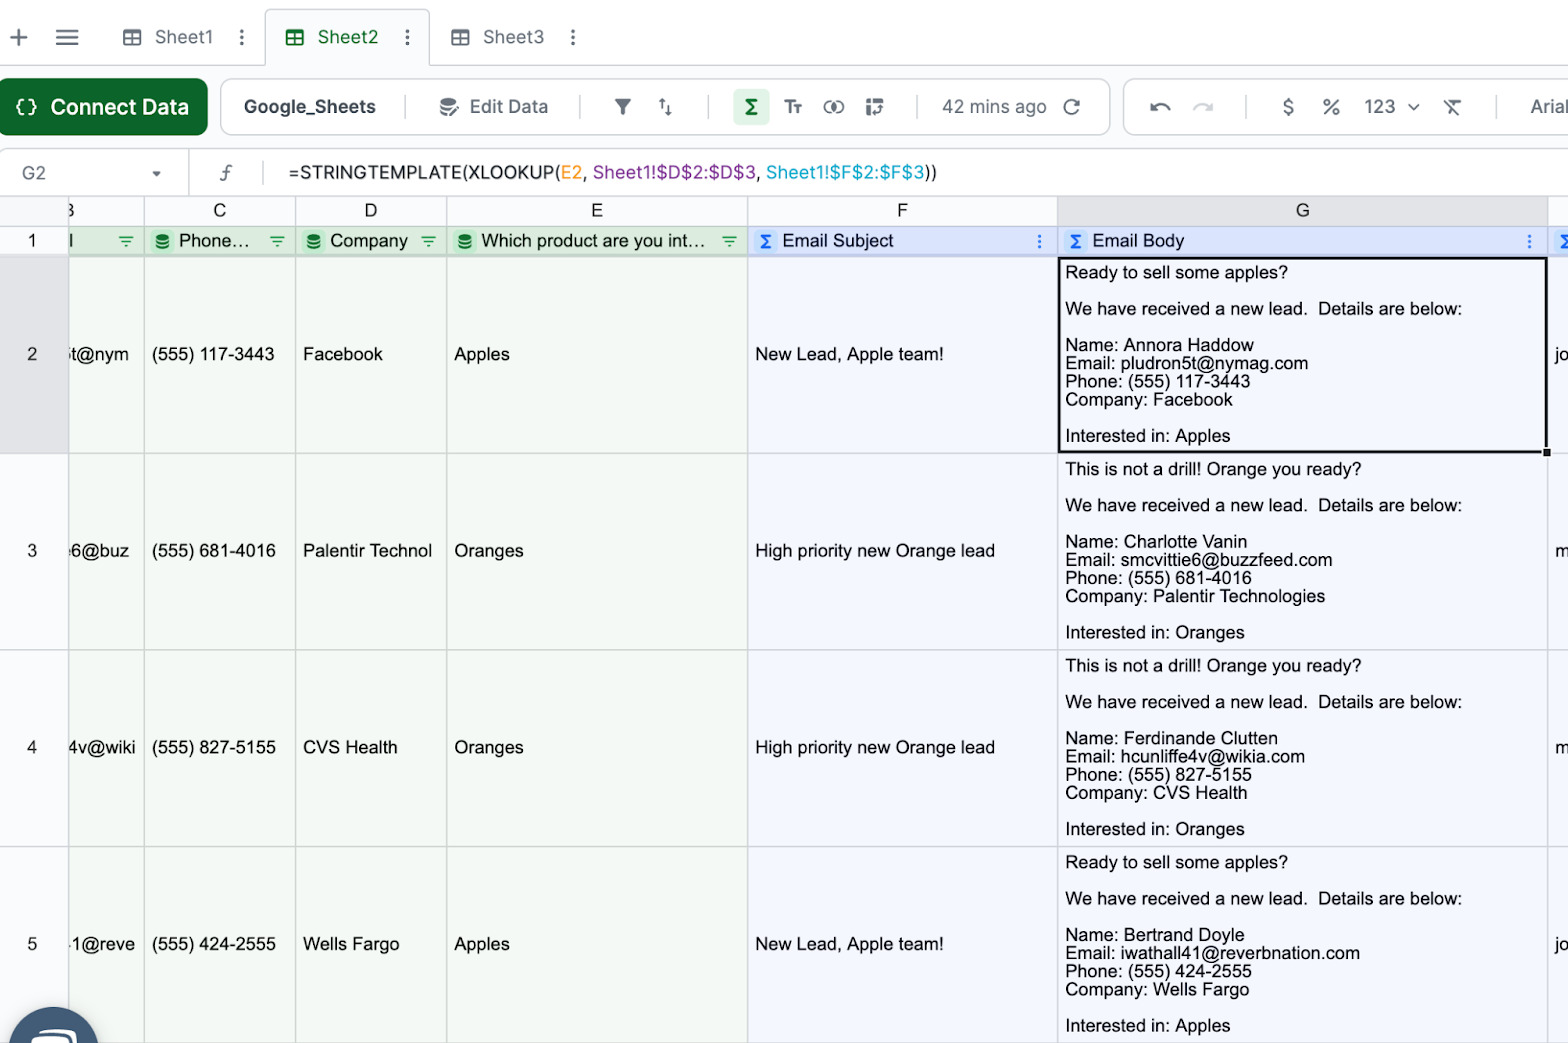
The formula for Email Subject is:
```=STRINGTEMPLATE(XLOOKUP(D2, Templates!$A$2:$A$3, Templates!$B$2:$B$3))```
Where:
D2 is the form response value that dictates which message is sent (e.g. Apples vs Oranges)
Templates!$A$2:$A$3 is the range in my email template matrix that matches to different response possibilities (e.g. Apples and Oranges)
Templates!$B$2:$B$3 is the range in my email template matrix that contains my different email subjects
Repeat the same steps for the email body, and voila! You now have dynamically generated email subjects and bodies.
Emails can be routed to various team members based on form responses, such as tech support severity or educational class selections. This system also allows for customized auto-responses in settings like online retail based on selected products.
You can also change your email content based on a form response. For example, an online store could send different auto-responses to customers depending on the product they chose.
We hope that you now understand how to send emails based on a response in google sheets. Check out some of our other articles for even more tutorials! We recommend reading our guide on how to forward responses from Google Forms to your email and send responses to multiple emails from Google Forms.
