In this article, we will show you how to set reminders in Excel for due dates. Simply follow the steps below!
Below we outline the steps on how to set a due date reminder in Excel:
If you haven't already signed up for a Lido account, sign up for free here: https://www.lido.app/go/signup
Lido functions as a dynamic spreadsheet that streamlines your workflow by integrating spreadsheet data with email functionality. To automate sending due date reminder emails, input necessary details like recipients, due dates, and email content.
Once your Lido file is set up, transfer your Excel data into Lido by copying and pasting it, then convert it into a table.
Each row should represent a due date reminder email you plan to send. If recipients vary for each reminder, include their email addresses in your table (consider column C in the example below). Otherwise, if you're sending emails to the same people (e.g., yourself or your team), you can skip this step.

Here's an example of data for due date reminder emails. Column C is optional; exclude it if recipients are consistent for each reminder.

Select the range, right-click, and choose "Convert Range to Table."
Give your table a name and save it.
If you've set up your data table in Lido, you're good to go. If not, input the data directly into Lido or copy-paste it from Excel.
Due date reminder emails should precede the due dates. Let's say we want to send reminders two days before the due date. The formula is simple:
reminder_date = due_date - 2
Here, the due_date refers to the cell containing the due date. If due dates are in column C, with the first due date in cell C2, then the formula becomes:
=C2-2

Press enter to generate a computed column. This specialized column type in Lido automatically applies the formula to each row, which is handy when adding more entries to your table.
Let's call this column "Send Date."
Now, let's craft the subject and body of the due date reminder email.
Begin by creating templates using your table's column names as placeholders, indicated by [@Column] syntax.
Create templates for email subject and body in a new worksheet as follows:

Then merge these templates with your table data from the other tab to make the email content dynamic. Achieve this by creating two new computed columns for Subject and Body, utilizing the STRINGTEMPLATE() formula within a computed column.
Start a new computed column and label it Subject.

Apply this formula in row 2 of the Subject column:
In our example, Sheet1!$B$1 represents the location of our subject email template. Ensure you adjust this to match your cell location if it's different; otherwise, the formula won't work. Also, remember to anchor the cell reference with $, ensuring all rows use the same template cell.
Now you should have a subject column displaying different due dates based on the values in column C.

Repeat the process for the email body. Create another computed column and apply the formula below, adjusting the cell references to align with your sheet:
You'll end up with something like this:

Lido's spreadsheet offers a unique formula type called Action formulas, which can send data externally but require manual triggering to execute. One such action formula is SENDGMAIL, allowing direct email dispatch from your spreadsheet.
The SENDGMAIL formula operates like this:
=SENDGMAIL(sender, recipient, subject, body, [status_cell], [cc], [bcc], [attachments])
Here's our basic SENDGMAIL formula:
=SENDGMAIL(<sender-credential>, B2, E2, F2)
To display SENDGMAIL only when today's date matches the reminder send date, incorporate an IF statement:
=IF(TODAY() = reminder_send_date, SENDGMAIL(sender, recipient, subject, body))
Here's how the formula functions:
If today's date matches the reminder_send_date, the SENDGMAIL formula is displayed; otherwise, FALSE is displayed.
Let's create a new computed column and input our formula below in row 2 (ensure to adapt the formula for your data). Rename the column to "Send Reminder" by double-clicking on the header cell.
=IF(TODAY() = D2, SENDGMAIL(<sender-credential>, B2, E2, F2))

As you can see, the SENDGMAIL formula appears only for dates when dispatch is due.
You've now established a dynamic due date reminder email system, ready to automate your Gmail due date reminders!
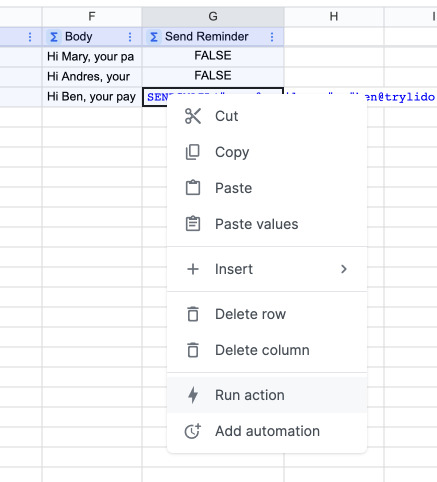
Right-click on the SENDGMAIL formula and select "Run Action" to send the email. The first time you send an email from Lido, you'll need to authenticate into your Gmail account.

Now, let's automate the execution of the "Send Reminder" column. For rows where SENDGMAIL appears, Lido can automatically execute them once daily, even if the file is closed.
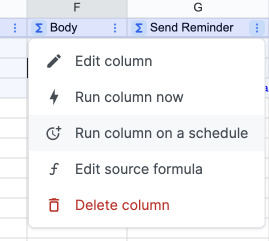
Access the menu for your "Send Reminder" column and choose "Run column on a schedule."

Select the preferred time of day for sending your messages, then confirm your selection.

From now on, at your designated time (let's say 1:15 PM or your chosen hour), Lido will automatically review if there are any pending due date reminder emails scheduled for dispatch, where TODAY matches the reminder_send_date. If such reminders exist, Lido will execute each SENDGMAIL formula, initiating the email dispatch.

Impressed? Take the next step with Lido by clicking here!
We hope that you now have a better understanding of how to use the excel due date reminder formula and how to set reminders in Excel for due dates. If you enjoyed this article, you might also like our article on how to set up an Excel reminder.