
Send an Email to Multiple Recipients (Easiest Way in 2025)
Until recently, sending multiple emails to multiple people from Google Sheets would require using its complex Script Editor. This article will show you the easiest method of sending email to multiple recipients using Lido.
Step 1: Prepare Your Google Sheet
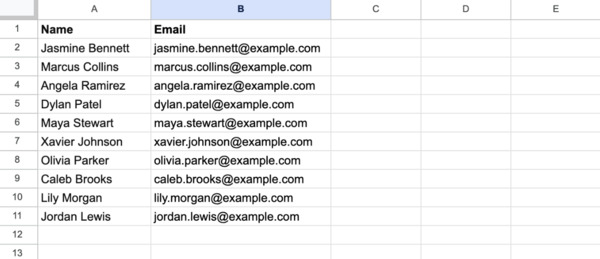
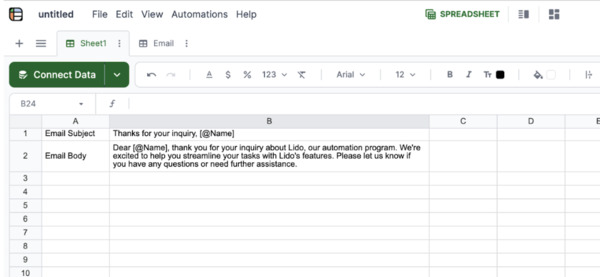
In Sheet 1, enter the details of your recipients in your Google Sheet. Include their name and mailing address. You can add other information you want to customize in your email body but remember to use separate columns for each detail.
Your Google Sheet will look like this.
Step 2: Create a Free Account in Lido
Go to https://www.lido.app/go/signup to create a free account for Lido, a new spreadsheet tool that simplifies email automation and is fully compatible with Google Sheets.
With Lido, you can easily send emails to multiple recipients using simple spreadsheet syntax.
Step 3: Connect your Google Sheet to Lido
In the upper left corner of Lido, click the green "Connect Data" button and select "Google Sheets" from the options.
Paste the URL of your Google Sheets document and click "Connect to Google Sheets."
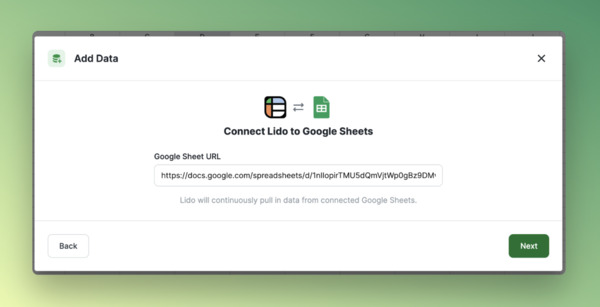
A dialog will appear prompting you to authenticate your Google account. Ensure you select the option that grants Lido access to your Google Sheets. Once done, click "Next."

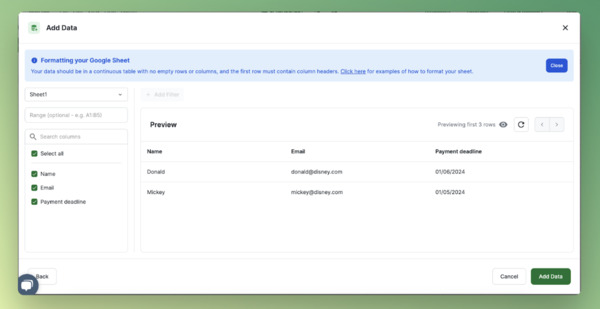
Select the columns from your Google Sheet that you want to connect to Lido.
Click "Add Data" to import your spreadsheet data into Lido as a table.
Step 4: Create Your Email Subject and Body
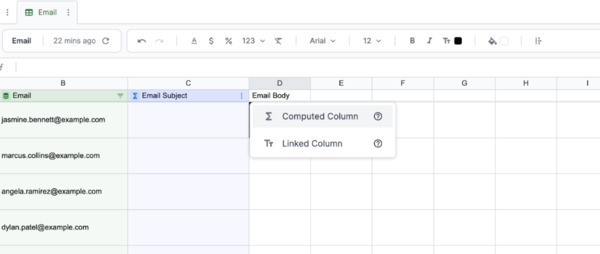
Create a new sheet by clicking the + button on the upper left area beside your worksheets. We'll name this sheet "Email" by clicking the three dots beside the worksheet tab and clicking Rename. We will reference this worksheet name in the next steps.
Input your email subject and body content this new sheet, referencing your columns as variables using [@ColumnName] format.
In Column B we will put the following templates
Email subject: "Thanks for your inquiry, [@Name]"
Email body: "Dear [@Name], thank you for your inquiry about Lido, our automation program. We're excited to help you streamline your tasks with Lido's features. Please let us know if you have any questions or need further assistance."
Your sheet should look like this
Step 5: Use the STRINGTEMPLATE Formula to Create Custom Text
Instead of manually changing all values in the Email Subject and Email Body, we will use a Computed Column in Lido using a formula called =STRINGTEMPLATE(). It will replace all references with the values of a specified row.
To create a Computed Column, type your column header in Row 1. Select “Computed Column” from the options.
The syntax of the formula we will put in the second row of our computed column is
=STRINGTEMPLATE("reference_cell”)
Where:
Reference_cell is the cell location of the value which we will change. Be sure to use $ signs before and after column letters. Also make sure you reference the correct sheet name here as in our example below.
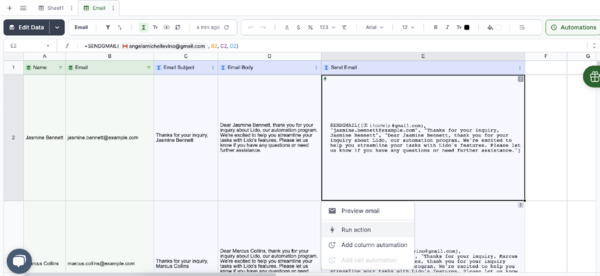
For the Email Subject in Column C, we will use this formula in Cell C2
```=STRINGTEMPLATE(Sheet1!$B$1)```
For the Email Body in Column D, we will use this formula in Cell D2
```=STRINGTEMPLATE(Sheet1!$B$2)```

Your dynamic values should now be automatically customized for each input.
Step 6: Use the =SENDGMAIL Formula
The formula to send an email from Lido is:
=SENDGMAIL(sender, recipient, subject, body)
Sender: the email address used to send emails (In our example we’ll use “LidoHelp@gmail.com”)
Recipient: The email address you want to send the email to, in our example this is in Cell B2
Subject: Your email subject has been generated in Cell C2
Body: The email body will be in D2
Our formula to put in the Send Gmail Column will now be
```=SENDGMAIL("LidoHelp@gmail.com,B2,C2,D2)```
Your Worksheet should now look like this:

Step 7: Test Your Email Automation
For our test email, we will change the email of one recipient to your email in Cell E2. This is so we can check our own inbox for the test message.
On this Send Email cell, right click and click “Run Action”. You’ll need to authenticate into your Gmail account the first time.
This should send the email to your inbox with the custom email body.
Step 8: Send All Emails on the Column by Clicking “Run Column Now”
On a Send Email Column, right click and click “Run Column Now”.
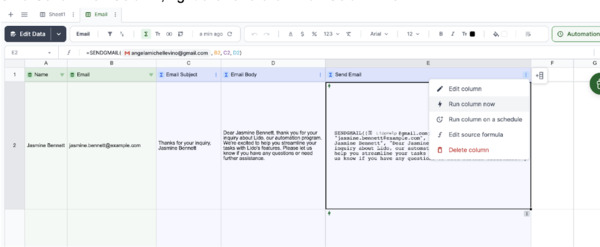
After this, you’ve successfully sent all the customized emails to multiple recipients. You can update the Google Sheet to add more recipients or change the email body to send other mailing updates.
We hope this helped you send email more easily than doing them manually. Find out how to send automatic email reminders or how to send recurring email reminders using Lido!